I have been working in bits and pieces on this mixed media collage background.
I'm trying to figure out what to put on top of the background. Any ideas?
My Teaching Blog: Art is Basic
Facebook
Etsy
Pinterest
Showing posts with label mixed media. Show all posts
New Mixed Media Collage on Canvas
Tuesday, February 10, 2015
I love painting on canvas boards, because they are sturdy and can take a bit of scraping and wiping. Materials in this collage include black and white images, acrylic paints, rub-on letters, stenciling, graphite, stamping, tissue paper and patterned paper.
I love to include things that are floating, like the upside down gingko leaf. I also like to make things look a little ethereal.
EE Cummings is also one of my favorite poets. I love his unconventional! use of punctuation.
Art is Basic
Etsy
All Creatures Great and Small | Mixed Media Collage
Thursday, June 12, 2014
I have been finishing up loose ends of projects that I started months ago.
In the past few days I have had a burst of enthusiasm to make art.
A common sight in my house during the day is my daughter at the kitchen table drawing a picture of her Care Bears or family. Me sitting at the table nursing baby Desmond while working on an art journal page.
I'm so lucky he's an easy-going baby.
Trust me. I know what it's like to have a colicky one.
Three months of playing at the park, sitting outside while Daria plays in her kiddie pool, chatting with neighbors close by and meeting friends for lunch. Summer really is a great time of year.
Etsy
Vintage Valentine Collage
Friday, April 4, 2014
Guess what? I actually managed to finish an artwork and blog about it!
Someone locally contacted me about participating in art show about LOVE and I thought this would be the perfect motivation for me to use some of the vintage Valentines cards in my stash. Since that initial couple of emails I haven't heard anything else about the show, so who knows if it's going to happen or if that opportunity is gone. Either way, it was a little kick in the pants to do something creative!
I used scrapbook paper cut into shapes, outlined in black doodles and white dots added. Strips of tissue paper and paints were added as well.
These flowers on the right side were from an Instagram photo of a bouquet of flowers my husband sent me one year on our anniversary.
A clown riding a pig? I had to use this in my collage!
Keep in touch with me!
Art is Basic website
Etsy Shop
Organic Shapes, Dots and Doodles
Friday, January 17, 2014
What is your definition of an art journal page? Do you consider mixed media collages (even without words) to be art journal pages?
My students at school saw me making this and they were so excited. "Wow! Can we make something like this?"
The Molotow Paint Marker in white is my new favorite marker! It wrote over all these paint layers really well. When I ordered it through that link above, I received a box of 6 markers (I think). I don't know if that was a mistake and if it was only supposed to be one, but I was only expecting one marker.
Linking to Paint Party Friday and Art Journal Every Day.
Keep in touch with me!
Art is Basic website
Etsy Shop
Anatomy of an Art Journal Page #4
Thursday, May 2, 2013
I thought it would be fun to "dissect" another art journal page. Looking at such busy and full pages can leave you wondering what exactly was used to make the page.
Here is a diagram of parts of the journal page:
If you liked this post, check out:
Some of the supplies used in the page:
Cutting, Pasting, Painting and Doodling
Monday, April 15, 2013
![]() |
"Art bring a little magic to an ordinary day." The background was colored with bleeding tissue paper and some paint. |
![]() |
This is a painting of my daughter stuffed unicorn.. painted with watercolors and acrylic paints. |
![]() |
A random art journal page with drawings, collage elements, watercolor paint and tissue paper image. |
Currently, I am reading: an awesome book by Jodi Picoult, called Keeping Faith. It's about a girl named Faith who (after her parents split up) she starts talking to God and develops stigmata. It is so engrossing. Every book by Jodi Picoult that I have read has been amazing!
Links to Visit:
- I love these amazing pictures by Thomas Lamadieu! From Doodlers Anonymous: " Thomas Lamadieu has been drawing in the space between buildings for his new series, SkyArt, and he's making us all look up again. Open spaces of blue sky replaced with drawn characters stuffed amongst the architecture. What's not to love?"
- Glue It Tuesday! I love these link parties and challenges. I always want to participate and I know that when summer comes and I have time off of work, I will be participating more frequently.
Thanks for reading! Best wishes, Marcia
Art is Basic website
My Art
Etsy Shop
Make Mail Art Postcards By Reusing Old Art
Saturday, January 26, 2013
Making mixed media postcards is fun and easy to do!
Here I used a variety of materials: scrapbooking paper, an image from a magazine, rub-on transfers, ink painted deli papers, markers and more.
Postcards made from recycling artwork
I must confess that I made these two 4x6" postcards by cutting old up old artwork. See, I have so many paintings and collages in drawers that I have created over the years. There's not room on my walls for all of them and I've given away others. Some I choose just to place in my drawers of collage fodder.Using old drawings, paintings and collages for mail art will give them new life
Find an interesting area of an old artwork and cut it up. Cut it into 4x6" sections for postcards or smaller for Artist Trading Cards. Add other collage elements or marks on top to tie the piece together.I made these for the postcard swap at Artists in Blogland.
Also sharing with Artists Play Room
Don't forget that there is a mail art call at Featuring magazine!
Here. Now.
Wednesday, December 12, 2012
-->
Recently I have been using a grid format in my artwork, so I
decided to use the challenge of creating an artwork based on a circular
structure. I taught a lesson on radial designs to my third and fourth grade
students and they created beautiful and intricate mandala designs so I was
inspired to use a circle in my artwork. I started this collage by drawing two
concentric circles on a piece of paper that was already painted. I cut the circles
to create a ring. Then, I glued this ring onto a new background. Using a
compass, I drew another circle outside of the ring. Then, I photocopied leaves
on a color copier and added words using letter rub-ons. Finally, I added color
and depth with markers, white out pen and oil pastels. I chose to place these
words on the image as a reminder that I
am here now. I need to embrace the moment I am in and not worry needlessly
about other times.
Mixed Media Canvases with Kids
Tuesday, December 11, 2012
Thanks for your kind comments about my fingers! They are actually healing much faster than I expected.
From time to time, I do a cross-post for both of my blogs.. My other blog is Art is Basic, where I chronicle my adventures teaching elementary art. I thought you might enjoy seeing some of the mixed media canvases I did with an after school art class!
I thought painted canvases would be a great gift for kids to give someone in their family, so I decided to do an after school art class which I taught today. The kids in this class were in grades K-5, so I had quite a range of skill levels. 23 kids signed up!
I bought a bunch of canvases, scrapbook papers and paints on Black Friday (yep, I braved the craziest shopping day to pick up some cheap art supplies.)
Each kid chose a 12x12" or 9"x12" canvas and a selection of scrapbook papers.
The kids cut out shapes and imagery from the patterned scrapbook paper. These were decoupaged on to the canvas using Mod-Podge puzzle saver glue (the kind that you can paint on to a finished puzzle to save it.) Paint underneath and on top of each shape. Smooth any wrinkles out with your fingers. When you are finished mod-podging, use a hair dryer to dry the glue.
The kids used acrylic craft paints to add paint and designs to their canvas. Colored sharpie markers were also used for fine details. It is very important to make sure the paint is dry (with a hair dryer) if you are going to use markers anywhere near the paint. It will ruin the markers if the paint is wet. Some students chose to write words on their picture.
The class ran from 3:15-5:00. The kids mostly all finished by 4:45, which was good because we had a HUGE mess to clean up. If I did this again, I might split it into two sessions. It was a long day for the littlest kids.
(I just got a twitter account if you're interested in becoming my twitter friend.)
Follow @marcia_beckett
From time to time, I do a cross-post for both of my blogs.. My other blog is Art is Basic, where I chronicle my adventures teaching elementary art. I thought you might enjoy seeing some of the mixed media canvases I did with an after school art class!
I thought painted canvases would be a great gift for kids to give someone in their family, so I decided to do an after school art class which I taught today. The kids in this class were in grades K-5, so I had quite a range of skill levels. 23 kids signed up!
![]() |
1st grade artwork |
I bought a bunch of canvases, scrapbook papers and paints on Black Friday (yep, I braved the craziest shopping day to pick up some cheap art supplies.)
![]() |
5th grader |
Each kid chose a 12x12" or 9"x12" canvas and a selection of scrapbook papers.
The kids cut out shapes and imagery from the patterned scrapbook paper. These were decoupaged on to the canvas using Mod-Podge puzzle saver glue (the kind that you can paint on to a finished puzzle to save it.) Paint underneath and on top of each shape. Smooth any wrinkles out with your fingers. When you are finished mod-podging, use a hair dryer to dry the glue.
![]() |
3rd grader |
The kids used acrylic craft paints to add paint and designs to their canvas. Colored sharpie markers were also used for fine details. It is very important to make sure the paint is dry (with a hair dryer) if you are going to use markers anywhere near the paint. It will ruin the markers if the paint is wet. Some students chose to write words on their picture.
![]() |
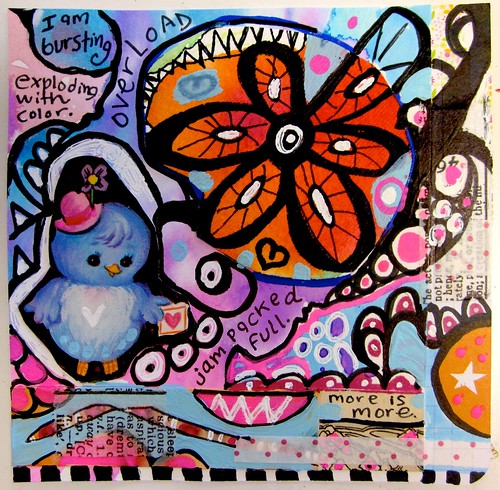
Do you see the "love Marcia" at the bottom? so sweet! (made by a kindergartner) |
The class ran from 3:15-5:00. The kids mostly all finished by 4:45, which was good because we had a HUGE mess to clean up. If I did this again, I might split it into two sessions. It was a long day for the littlest kids.
![]() |
Kindergarten-- Lots of expression! |
![]() |
2nd grade |
![]() |
3rd grade |
![]() |
Kindergarten |
![]() |
2nd grade Great shapes! |
![]() |
1st grade I love the colors in this one. |
![]() |
4th grade girl |
![]() |
The four seasons-- 5th grade boy |
(I just got a twitter account if you're interested in becoming my twitter friend.)
Follow @marcia_beckett
5 x 5 Collaborative Art Project
Sunday, November 18, 2012
I participated in Seth Apter's 5x5 collaborative art project. You can see some of the artwork on his blog today.
Participants were asked to make a 5" x 5" artwork responding to one of the following:
1. If your artwork could talk, what would it say?
2. Who has had the most impact on your creative life?
3. What is one thing you have never shared with the creative community?
(I answered question #1)
Participants were asked to make a 5" x 5" artwork responding to one of the following:
1. If your artwork could talk, what would it say?
2. Who has had the most impact on your creative life?
3. What is one thing you have never shared with the creative community?
(I answered question #1)
Fall Fearless and Fly: Third Challenge
Wednesday, November 7, 2012
I finally finished the third challenge for Fall Fearless and Fly. I like to have prompts to kind of lead me in a direction.
The prompts for this challenge were:
Headline Prompt: Triumphs and Defeats: What do you see as your greatest triumphs or defeats? What have they taught you? Which have you learned more from?
Color Prompt: Black and white
Quote Prompt: Not in the clamor of the crowded street, not in the shouts and plaudits of the throng, but in ourselves, are triumph and defeat. Henry Wadsworth Longfellow
You can choose any or all of the prompts for your page. I chose to use only the color prompt and make a collage using black and white painted papers.
I enjoyed using only black and white. It was much different than the artwork I have recently been making. The collages and art journal pages I have recently made have been BURSTING with color. I do love color, but this collage forced me to consider shape, line and value more.
Check out these fun places: Paint Party Friday, Art Every Day Month and Art Journal Every Day
The prompts for this challenge were:
Headline Prompt: Triumphs and Defeats: What do you see as your greatest triumphs or defeats? What have they taught you? Which have you learned more from?
Color Prompt: Black and white
Quote Prompt: Not in the clamor of the crowded street, not in the shouts and plaudits of the throng, but in ourselves, are triumph and defeat. Henry Wadsworth Longfellow
You can choose any or all of the prompts for your page. I chose to use only the color prompt and make a collage using black and white painted papers.
I enjoyed using only black and white. It was much different than the artwork I have recently been making. The collages and art journal pages I have recently made have been BURSTING with color. I do love color, but this collage forced me to consider shape, line and value more.
Painted Paper Mosaic Tutorial
Sunday, November 4, 2012
Several people asked me how I made this mosaic, so I thought I would show you through a tutorial.
Cut out more and more shapes from scrapbook papers, other patterned papers, painted scraps you have lying in your stash and fill your page.

Painted Paper Mosaic Tutorial
Here is the colorful painted paper mosaic that I made last night!
1. Gather a pile of colorful painted scraps.
2. Cut out shapes of different kinds and glue them as close together as possible. Try to cut and place them so that they fill in the space without major gaps. It's like putting together a puzzle!
Cut out more and more shapes from scrapbook papers, other patterned papers, painted scraps you have lying in your stash and fill your page.
Here is the page full of cut and pasted shapes.
3. Fill in any remaining spaces with watercolor paints, colored pencils or markers. I made sure to leave small outlines of white between the shapes.
4. Another way to add details and embellishment is to take a white-out pen and draw on top of the shapes. I added dots and doodles.
Here is the finished artwork again:

Labels:
collage,
mixed media,
mixed media collage,
mosaic,
painted papers,
tutorial
Subscribe to:
Posts (Atom)